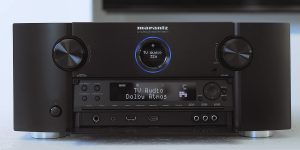
AV receiver setup is crucial in achieving the ultimate audio and video experience. A poorly calibrated device can lead to distorted sound and reduced clarity. And ultimately, this may result in a disappointing viewing experience.
So, if you search for tips for setting up and calibrating your AV receiver for optimal performance, that’s more than understandable. With guidance, you’ll be well on your way to enjoying your favorite movies, TV shows, and music like never before.
In this article, I’ll walk you through setting up your home theater setup — from connecting your speakers to adjusting your audio settings. All to ensure you’re getting the most satisfactory performance. So let’s dive into this.
Starting settings

Setting up your AV receiver may be daunting, especially if you’re new to home theater systems. But you can get your device up and running — just follow these home theater configuration tips.
Think of proper positioning and placement
Finding the right spot for your receiver is critical for optimal performance. Avoid placing it in an enclosed space, such as a cabinet, since this can cause overheating. Instead, find a stable surface and make sure that the device is well-ventilated. Additionally, you’ll want to consider its accessibility for future connections and use.
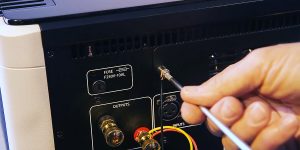
Connect speakers
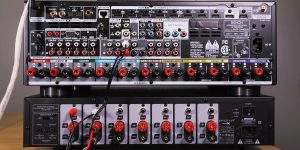
Make sure you connect your speakers to the appropriate terminals on the receiver and that the polarity of the speaker wire matches. If you’re using different types of speakers, adjust your settings accordingly.
Hook input devices
Ensure you’re using the correct cables when connecting your input devices, such as your TV, game console, set-top box, and Blu-Ray player. Also, remember to connect each device to the corresponding input on the receiver to avoid compatibility issues. Finally, use a universal remote to simplify your experience if you have multiple devices.
Select input and navigate the menu
Once you connect all devices, navigate to the input selection menu on your receiver to check if all your devices are recognized and working correctly. You may also explore the receiver’s menu options to adjust audio and video settings and customize your experience further.
Check firmware and software updates
If new firmware and software updates are available for your receiver, make sure to install them. This will enable you to address bugs, improve device compatibility, and add new features. Look into your receiver’s manual or manufacturer’s website for instructions on how to check for and install updates.
Test the system
Once you’ve completed all the setup steps, test your system. For example, play music or a movie to verify if you’re getting the optimal performance out of your AV receiver. If something isn’t working correctly, refer to your manual or contact customer support for assistance.
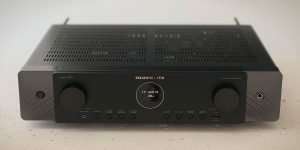
Speaker configuration

Are you getting the most out of your home theater system? The answer is likely no if you’re not paying attention to your speaker configuration. However, properly configuring your speakers can make all the difference when it comes to achieving an immersive home theater experience. Here’s how to configure your speakers for the utmost performance of the whole system.
Find an optimal speaker placement
Consider your room’s acoustics and layout when determining where to place your speakers. Also, keep in mind that different speaker configurations require different placement strategies. For example, a 5.1 surround sound speaker setup requires specific placement of the front left, center, and right speakers, as well as the surround left and right speakers.
Adjust Speaker Levels and Settings
As you have your speakers set up in the correct positions, adjust their levels and settings. Adapting the settings can help you balance the sound and reduce distortion. Many receivers come with automatic calibration systems to help you adjust your speaker levels and settings.
Consider setting Dolby Atmos
Dolby Atmos system is an advanced audio format that uses height channels to create a truly immersive sound experience. However, configuring a Dolby Atmos system can be more complex than a standard surround sound system. So, it’s better to do your research and follow the manufacturer’s instructions carefully.
Room calibration settings

You can’t do without calibrating your speakers and adjusting settings if you want to fine-tune your home theater system and optimize sound in your listening environment. Below, I’ll provide different techniques and tools you can use to calibrate your speakers.
Built-in room-correction systems
Many modern AV receivers come with built-in room correction systems. They work great for adjusting your speaker settings and optimizing sound quality for a particular space. These systems use a microphone to measure the frequency response and acoustic characteristics of your room. Then, they apply filters to compensate for any irregularities or acoustic issues.
Some of the most popular room correction systems include Audyssey, Dirac, and Yamaha’s YPAO. Each system works a little differently. However, their main idea is the same — to create a more balanced and accurate sound in your listening environment.
Manual calibration techniques
In addition to built-in room correction systems, you can also use manual calibration techniques. They can be especially handy if you have a unique listening environment the built-in systems can’t fully correct. For example, you may:
- Use an SPL meter to measure the sound levels of each speaker in your system. Or estimate the volume of your room and adjust your speaker settings accordingly.
- Adjust your speaker distance and delay settings. This involves adjusting the settings on your receiver to ensure that sound from each speaker arrives at your ears at the same time.
Network and streaming setup

I bet you want to have a home theater system that can smoothly handle streaming technologies and deliver high-quality content without interruption. And here is how you can provide a robust receiver connection.
Connect a receiver to Wi-Fi or Ethernet
Depending on your receiver, you may be able to connect it to your home network via Wi-Fi or Ethernet. Wi-Fi is more convenient, but Ethernet is generally more stable and reliable. To connect to Wi-Fi, enter your network name and password. Plug in a cable to set up a connection via Ethernet.
Set up streaming services
Once your receiver is connected to the internet, set up your favorite streaming services. This usually involves logging in to your account or entering activation codes on the receiver. Each service is a little different, so refer to the manufacturer’s instructions for specific guidance.
Use built-in streaming apps
Many AV receivers come with built-in streaming apps that allow you to access content directly from the receiver. These apps may include popular services like Netflix, Hulu, or Spotify, as well as niche services and apps for streaming audio, video, and more. To use these apps, select them from the receiver’s menu and navigate through the available content.
Casting and AirPlay
With casting and AirPlay, you can wirelessly stream content from your mobile device to your receiver. To use the casting feature, install a casting app on your device and select your receiver as the destination device. AirPlay works similarly but is exclusive to Apple devices.
DLNA and media servers
DLNA (Digital Living Network Alliance) and media server software let you stream content from your computer or NAS (Network-Attached Storage) device directly to your receiver. To set this up, install the media server software on your computer or NAS device and configure your receiver to recognize it.
Streaming quality and settings
Finally, you may want to explore the streaming quality and settings receiver options. These options include adjusting video quality, choosing audio formats, and more. Adjusting these settings will help you achieve the desired streaming quality and ensure your content is cast without interruption.
![Best 2-Channel Receiver [Expert Reviews and Buying Guide]](https://hometheaterology.com/wp-content/uploads/2023/11/best-2-channel-receiver-stereo-300x150.jpg)